

기본적으로 우리는 하나의 프로젝트에는 main()가 하나만 존재해야 한다는 것을 알고 있습니다. 그렇기 때문에 매번 새로운 예제 학습시 새로운 프로젝트를 만들게 됩니다. 그럴 때마다 이전에 사용했던 코드를 보려면 다시 그 프로젝트를 찾아 열어야 한다는 불편함이 있지요. 이러한 불편함을 조금이나마 보완하고자 하나의 솔루션에서 여러 개의 프로젝트를 만들 수 있는 방법을 소개드리고자 합니다.
방법은 간단합니다. 기존에 새로운 프로젝트를 만들기 위해 새로 만들기로 들어갔다면,
이제는 추가를 통해 새 프로젝트를 생성해주는 것입니다.
1. 파일 - 추가 - 새 프로젝트로 들어갑니다.

이제 아래 그림처럼 아주 익숙한 화면이 나올겁니다. 만들어 주시면 됩니다.
2. 새로운 프로젝트를 생성해주세요.


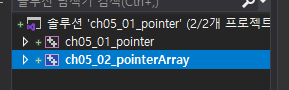
그러면 좌측 상단 솔루션 탐색기에 새로운 프로젝트가 추가되는 것을 보실 수 있습니다.
이전 같았으면 다시 탐색기가 열릴 텐데 이와같이 추가가 되었어요.
[참고사항]
그런데 여기서, 끝내면
빌드를 해도 우리가 원하는 프로젝트에서 빌드가 되지 않는 경우가 있습니다!
이것은 솔루션 설정을 안해주었기 때문인데요.
1. 프로젝트 솔루션을 오른쪽 클릭 해서 속성으로 들어갑니다.


기본 설정 값이 한 개의 시작 프로젝트로 설정되어 있으실 겁니다.
이것은 처음 솔루션을 생성한 프로젝트에 잡혀 있는데요. 저희는 각각의 프로젝트마다 실행하기 위해 이 설정을 바꿔 줄 겁니다.
2. 현재 선택 영역으로 설정 변경하기

변경 후 확인을 눌러주시면 이제 우리가 선택한 프로젝트가 정상적으로 빌드(실행)될 것입니다.
이를 통해 이제 과제나 프로젝트를 할 때에도 조금이나마 불편함을 해소할 수 있게 되었습니다.
그럼 오늘도 즐거운 코딩!!
반응형
'코딩 | 개념 정리 > Visual Studio' 카테고리의 다른 글
| VSCode 단축키 모음 (0) | 2022.03.19 |
|---|---|
| [Visual Studio] 비쥬얼 스튜디오 구(이전) 버전 다운로드 방법 (6) | 2021.10.15 |
| Visual Studio Code 터미널 설정하기 (0) | 2021.07.15 |
| Visual Studio 단축키 모음 (0) | 2021.02.28 |
| vs code font size 변경 (0) | 2021.01.01 |